Leveraging AWS SSO (aka Identity Center) with Azure AD

Setting up AWS IAM Identity Center (successor to AWS Single Sign-On) henceforth called AWS SSO (because AWS charges for egress), is an excellent service to help you get rid of IAM users and enforce identity best practices around second-factor authentication, on and off-boarding employees, and assigning the right level of access depending on job function.
Many companies use Active Directory and AzureAD as their source of authority for identity and authentication. So it would be a good practice to leverage AzureAD as the identity store and authentication mechanism for AWS SSO.
Alas, the AWS documentation, in what must be a desire to be cruel, redirects you to Microsoft documentation to configure AzureAD with AWS SSO. That documentation is unclear (as I said, it’s from Microsoft), so this blog post will help you get it set up in probably, under 30 minutes.
Prerequisites
We will assume you already have an AzureAD tenant, some level of global admin for the AzureAD tenant, and that you’ve set up AWS SSO.
Note: If you have existing users in the AWS SSO built-in identity store, one of two things will happen:
- If the username is not in the form of the email address, the user will stop working once this process is complete.
- If the username is in the form of the email address in AzureAD, the user’s password and MFA will no longer be active, and they will authenticate to the Microsoft AzureAD authentication page.
Setting up
Go ahead and open three browser windows/tabs. One with this post, one for the AWS Console, and one for the AzureAD Portal.
Create an Enterprise App in Azure AD
- In the Azure portal, navigate to the Enterprise Applications page.
- Click on “New application” at the top
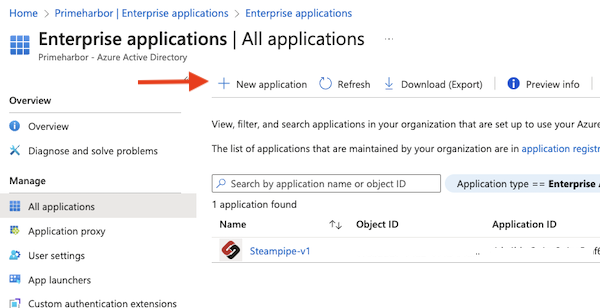
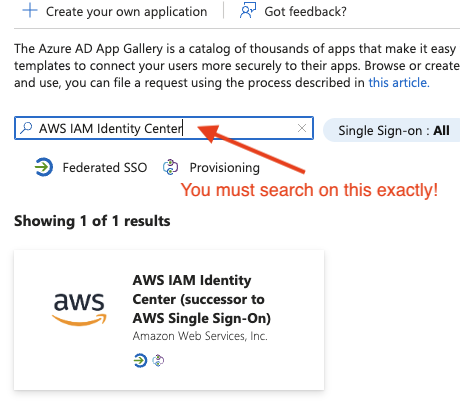
- Search for “AWS IAM Identity Center” exactly like that, and click on it.
- Give it a useful name
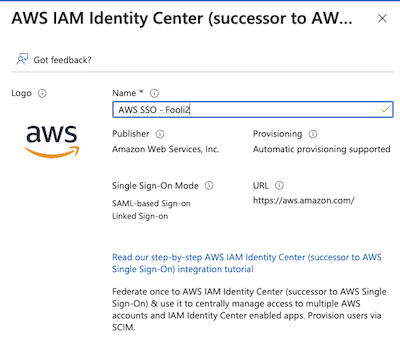
- Click Create
Configure the Identity Store in the AWS Payer
- Navigate to AWS SSO in the console
- Click on Settings
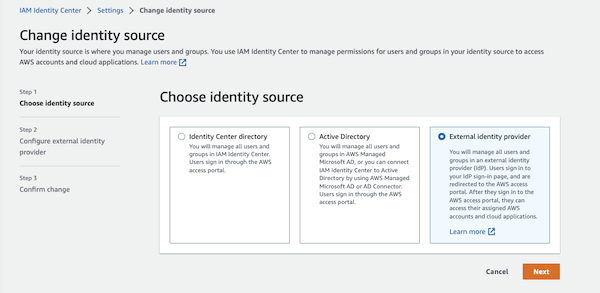
- Under Identity Source, click on the Actions drop-down and select “change identity source”.
- Select “External identity provider” and click Next
- Download the Metadata file. You will need that for the next step.
- Also note the “AWS access portal sign-in URL”. You will need that in a moment.
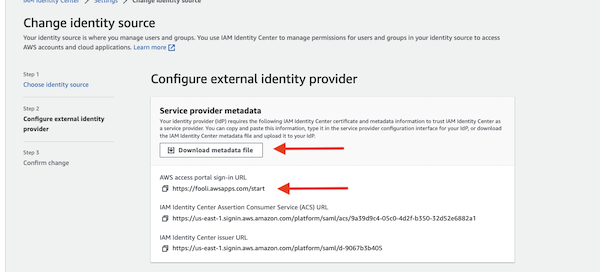
Do Not navigate away from this page. There is more to do
Configure Single Sign-on in the Enterprise App
- Under your Enterprise App, navigate to “Single sign-on” on the left side.
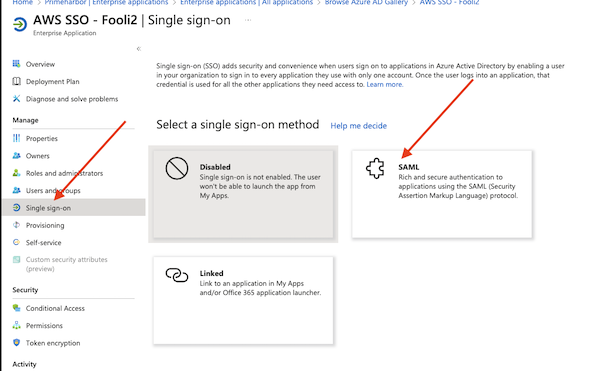
- Select SAML
- Click “Upload metadata file” and select the Metadata file from step-5 above.
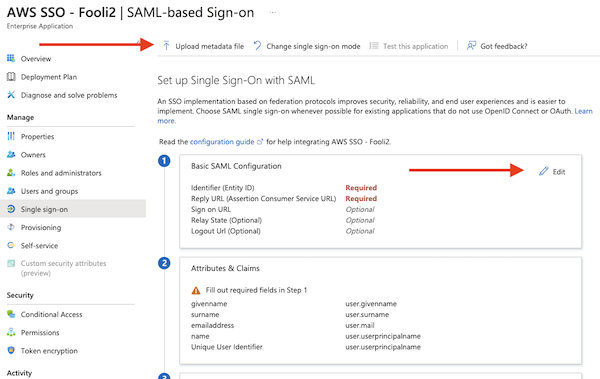
- Then click on “Edit” under “Basic SAML Configuration”
- The Identifier and Reply URL should be populated from the metadata file.
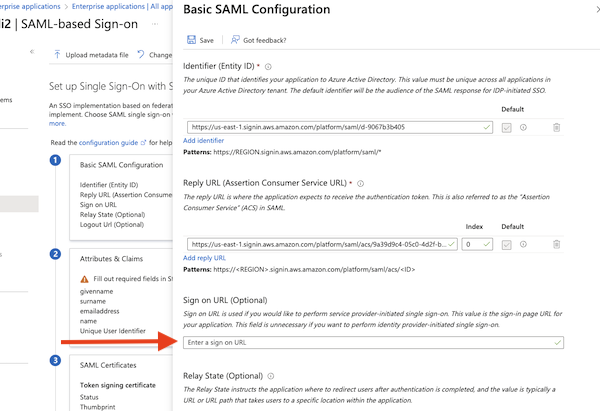
- Enter the Sign On URL from step 6 above.
- Make sure to hit save.
Get the Metadata file from Azure and add it to AWS
- Download the “Federation Metadata XML” file from Azure AD. Click on Download
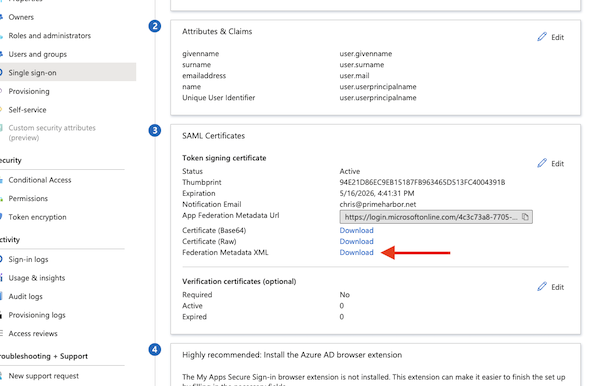
- Upload that file under “IdP SAML metadata” on the AWS page
- Click Next, and then type “ACCEPT” to confirm the change
At this point, you have now told AWS to use AzureAD as your identity store. If you navigate to your AWS SSO login page, it should re-direct you to a Microsoft login page. You will probably get an ugly error, as AWS SSO has no users for Azure to authenticate.
Setting up user and group provisioning
Now, you could stop here and create a bunch of users with a username that matches the email address in AzureAD. All authentication would happen via Microsoft, and authorization would happen in AWS.
However, you can also leverage AzureAD for the authorization piece, and to do that, you need to configure SCIM provisioning.
- Click Enable for automatic provisioning in AWS SSO
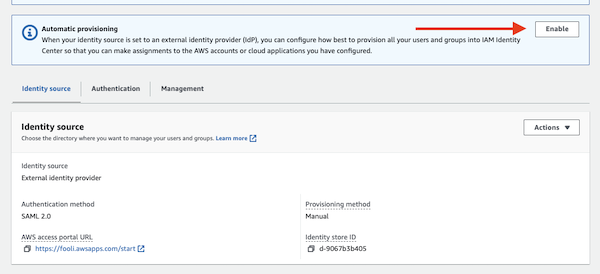
- In AzureAD, Navigate to the provisioning tab on the left side
- And then the provisioning under Manage on the left side.
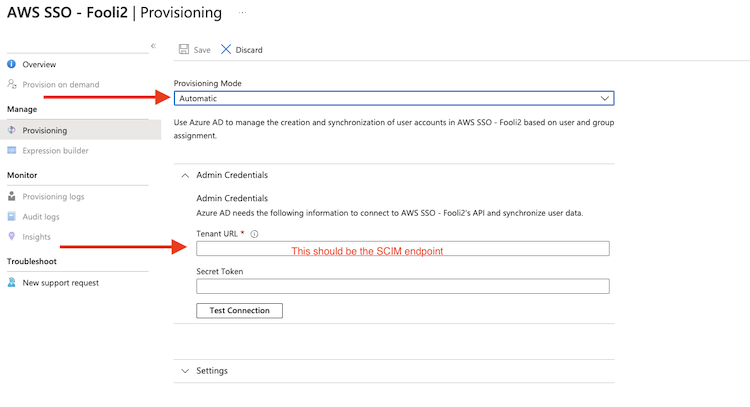
- Set mode to Automatic
- Enter the SCIM endpoint from AWS in the Tenant URL field,
- Then copy the long secret from AWS into the secret token box
- Click “Test Connection”.
- Under settings, set an email notification
- Under Scope, tell it to sync all users.
- Click Save at the top of the screen.
While the AWS Console no longer allows you to manage Group membership, the AWS CLI does allow it. Run this command to add a user to a group:
aws identitystore create-group-membership --identity-store-id d-90b40567b3 --group-id 86458d45-5051-70c7-4eaa-2ab95afba652 \
	--member-id UserId=a458c468-c011-7032-5da6-9d5bad9a50a7
{
    "MembershipId": "04a8a488-0051-707c-2a8b-5a81bd9a9998",
    "IdentityStoreId": "d-9067b3b405"
}
You can find the identity-store-id, group-id and member UserId in the AWS Console.
That’s it!
It takes about 40 minutes for AzureAD auto-provisioning to run and sync with AWS SSO, so if you don’t see anything right away, go to lunch and come back.